
How to Enable Multiple Sessions [Windows Server and RDP]
In this guide, you’ll learn how to enable multiple RDP sessions and resolve common issues that may arise. To connect to a machine using any remote desktop client, enable Remote Desktop and ensure users have authorization for RDP access. Keep in mind that desktop versions of Windows limit concurrent RDP sessions to one active user. run mulitple rdps This guide will also help you fix the “The Number of Connections to This Computer is Limited” error How to Enable Multiple Sessions [Windows Server and RDP].
By default, Windows Server disables multiple RDP sessions, meaning another administrator connecting will disconnect your session. Follow this tutorial to configure your server, allowing you to run multiple RDPs efficiently, whether on a single server or multiple servers.
Enable Multiple RDP Sessions
Discover how to activate two RDP sessions and allow more than two. First, enable Remote Desktop on your PC.
To enable multiple RDP connections, disable the restriction limiting the server to a single session per user, then adjust the maximum allowed connections.
Step 1. Activate Multiple RDP Connections
Follow these steps to allow multiple RDP sessions on Windows Server:
- Log in to your RDP server.
- Press Windows Key + R to open the Run dialog.
- Type gpedit.msc and press OK to open Local Group Policy Editor.
- Navigate to:
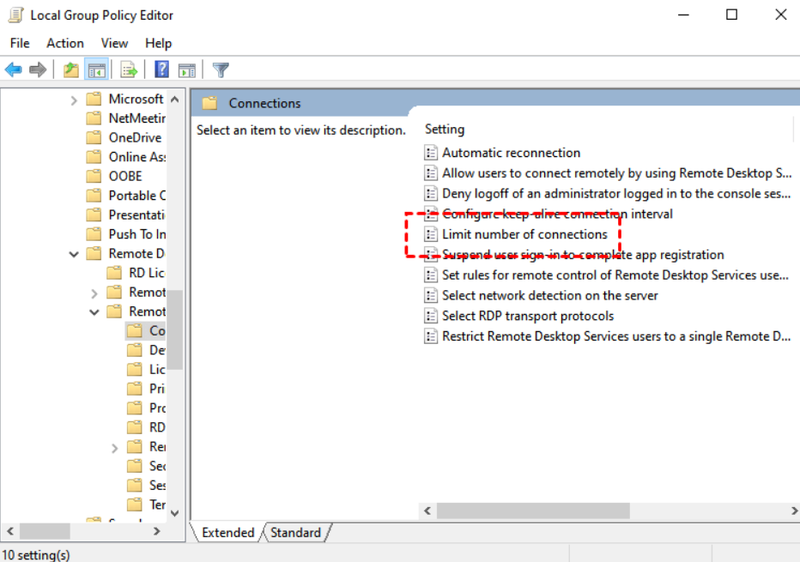
Computer Configuration -> Administrative Templates -> Windows Components -> Remote Desktop Services -> Remote Desktop Session Host -> Connections
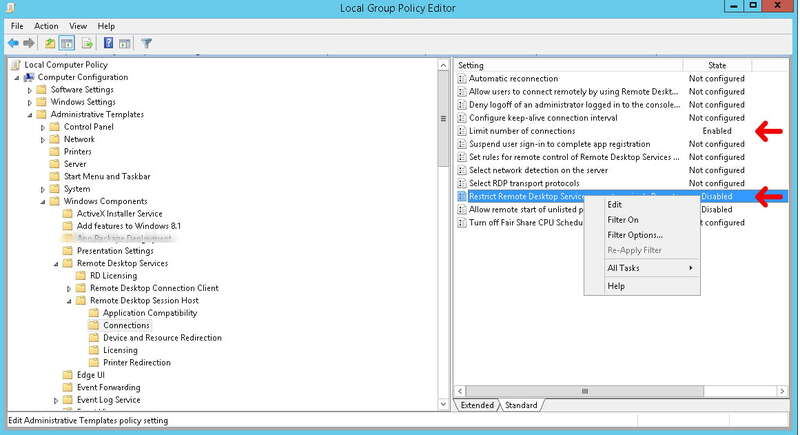
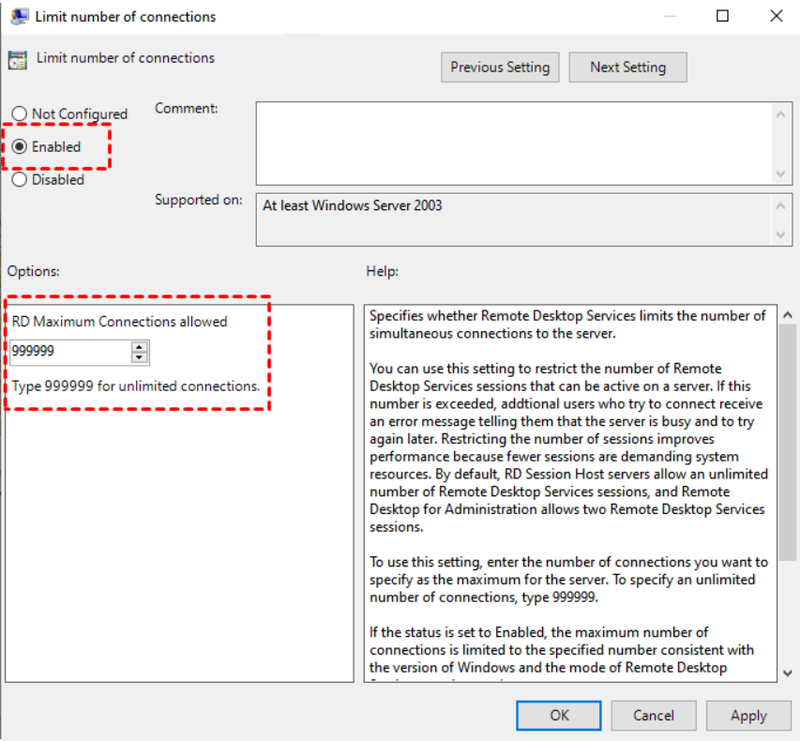
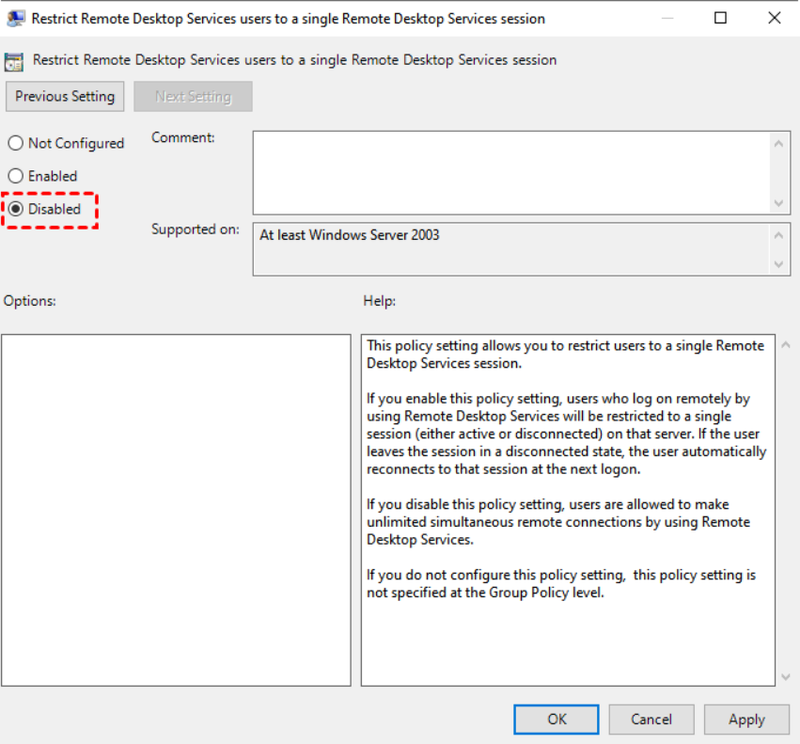
Restrict Remote Desktop Services users to a single session: Set to Disabled and press OK. how to use multiple rdps at once using rdpwrap Limit number of connections: Set to Enabled, then increase the RD Maximum Connection allowed to 2.
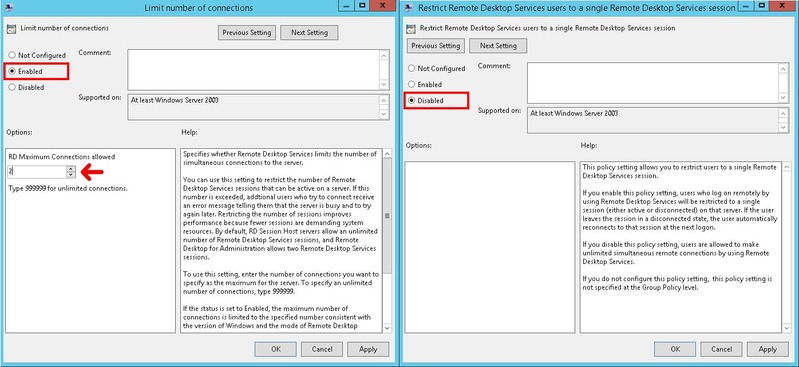
Note: If you set it more than 2, it won’t make any difference because you can make two concurrent sessions in this case! It’s done; now you should be able to have multiple RDP connections at the same time.
Step 2. Create New Remote Desktop Users
To manage RDP sessions effectively, it’s best to create separate users. However, you can connect multiple times to RDP using the same user account!
- Steps to Create Users:
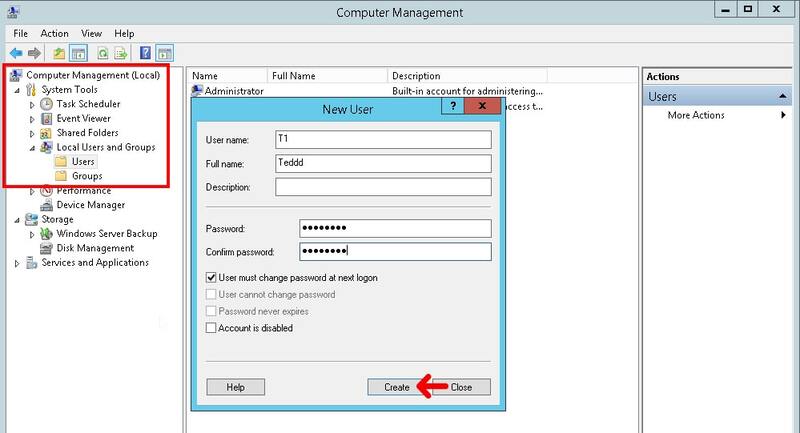
- Open Computer Management by typing compmgmt.msc in the Run dialog and pressing Enter.
- Navigate to Computer Management (Local) -> Local Users and Groups -> Users. Right-click on Users and select New User.
- Open Computer Management by typing compmgmt.msc in the Run dialog and pressing Enter.
Note: Add the newly created users to the Remote Desktop Users Group.
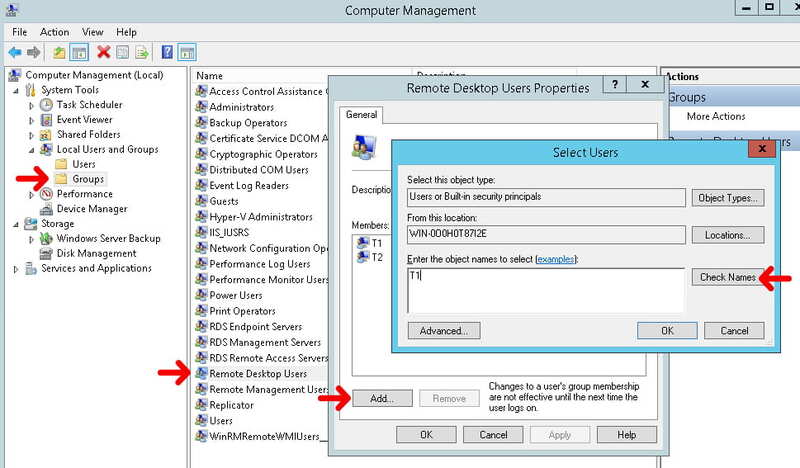
- Fill out the required fields and create as many users as needed (for now, just 2 users).
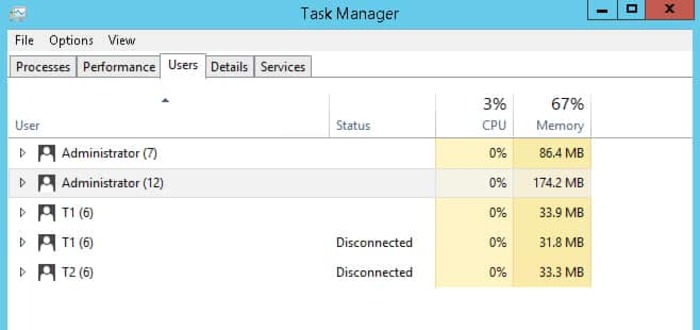
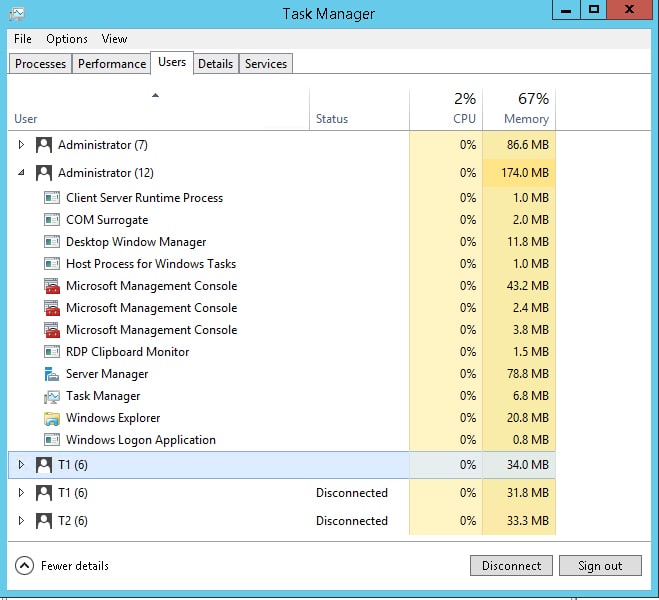
Test your setup by connecting to RDP with two devices using different user accounts. woshub mulitple rdp Then, open Task Manager to view online users and their sessions.
Using the above steps, you can Enable Multiple RDP Sessions successfully. Stay with us! There are so many to learn.
Allow More Than 2 Remote Sessions
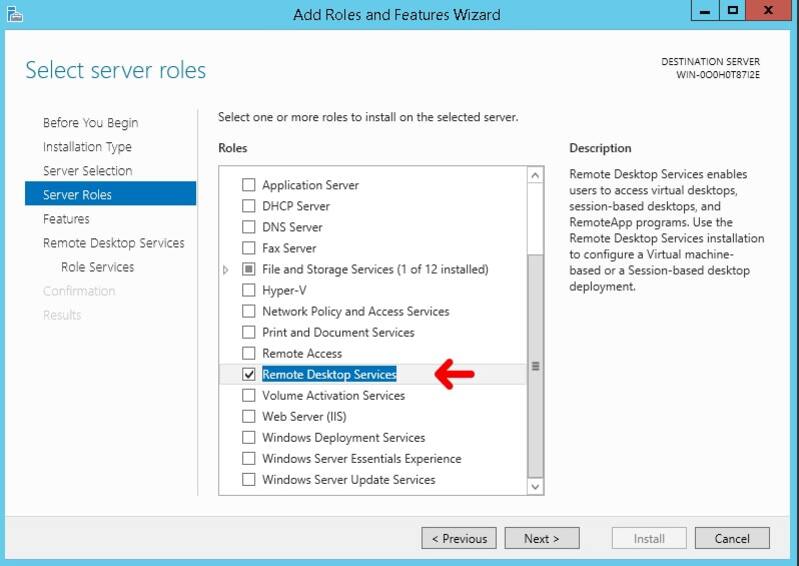
To enable more than two remote users, install Remote Desktop Services (RDS) enhanced multi user support for terminal servers windows 11. While an RDS license is required, installing RDS provides a 120-day free trial for this feature. Here, we’ll install RDS without using an ADDC (Active Directory Domain Controller).
- Step 1. Install RDS
- Open Server Manager.
- In the Dashboard, select Add roles and features.
- Choose Role-based or feature-based installation in the Installation Type step and click Next.
- Select a server from the server pool in the Server Selection step and proceed.
- Tick the Remote Desktop Service checkbox in the Server Roles step and click Next.
- Open Server Manager.

- Proceed to the Features step with default options.
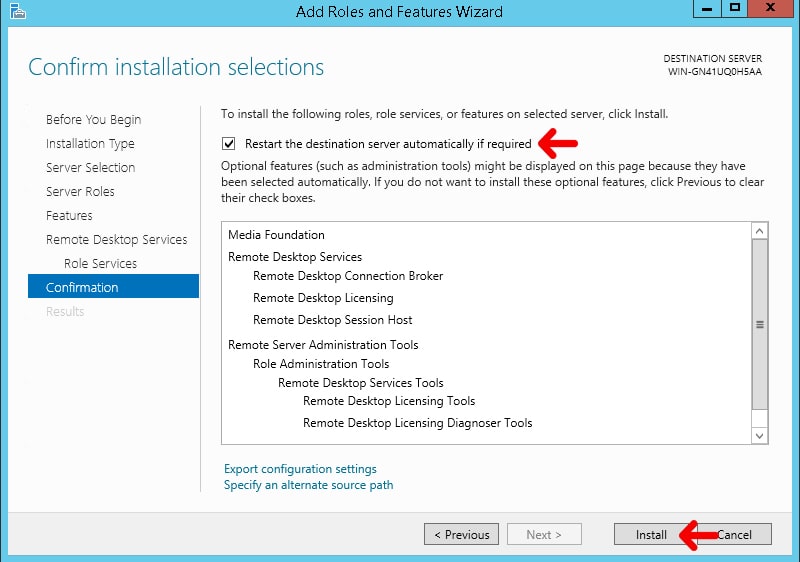
- Tick Remote Desktop Connection Broker and Remote Desktop Session Host checkboxes, then click Next.
Note 1: Accept any pre-required role services or features if prompted.
Note 2: To use RDS beyond the 120-day trial period, install the Remote Desktop Licensing role as well.
In the final step, tick Restart the destination server automatically if required and click Install.
Note: Installation may take some time and might require several server reboots.
Once done, increase the RD Maximum Connection allowed in the Limit number of connections file (e.g., 99) and set both files’ statuses as described earlier Buy RDP all locations.
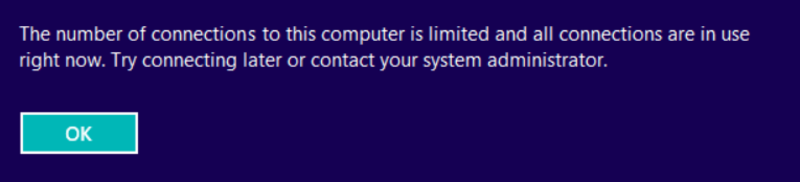
How to Fix “The Number of Connections to
This Computer is Limited”
When using Remote Desktop Protocol (RDP) to connect between Windows Server instances, users might encounter the “The Number of Connections to This Computer is Limited” error. This occurs when the session limit is reached, preventing further connections.
In this guide, you’ll learn how to fix this error using multiple solutions. When the maximum configured connections are reached, subsequent users will encounter this issue.
Server operating systems, like Windows Server or Linux, provide the platform for running applications. They ensure network connectivity and access to hardware resources. While RDP servers are a smart solution for remote work, they can face issues. Bugs causing server problems often occur in layers such as the Network, Hardware, or OS, but most are found in the application layer. Today, we’ll tackle one such issue and learn how to resolve it.
After purchasing a Windows RDP, configure it to support multiple concurrent RDP sessions, enabling separate sessions for different users. You can adjust the number of allowed simultaneous connections on your server.
If the “The number of connections to this computer is limited” error persists despite not exceeding the maximum allowed connections, this guide provides two solutions to resolve it.
Solutions to Fix “The Number of Connections to This Computer is Limited” Error
If you frequently face the “The Number of Connections to this Computer is Limited” error, this guide provides steps to resolve it. After ensuring your RDP server is properly configured, test the following solutions. If your system is part of a domain, ask the domain controller to support this setup. Additionally, choosing a reliable RDP provider can prevent such errors.
For non-domain systems, disconnect the network cable, turn off WiFi, and restart the computer. After rebooting, reconnect the cable and activate WiFi. Linux RDP This often resolves the issue.
If the error persists, this tutorial offers two methods to fix it, letting you choose the best solution based on your system and expertise.
Solution 1: Check for the Number of Connected Users
The error may occur because active RDP sessions remain disconnected. Some users close the RDP application without signing out, keeping their sessions open. To check:
- Press Ctrl + Shift + Esc to open Task Manager.
- Go to the Users tab to view active users.
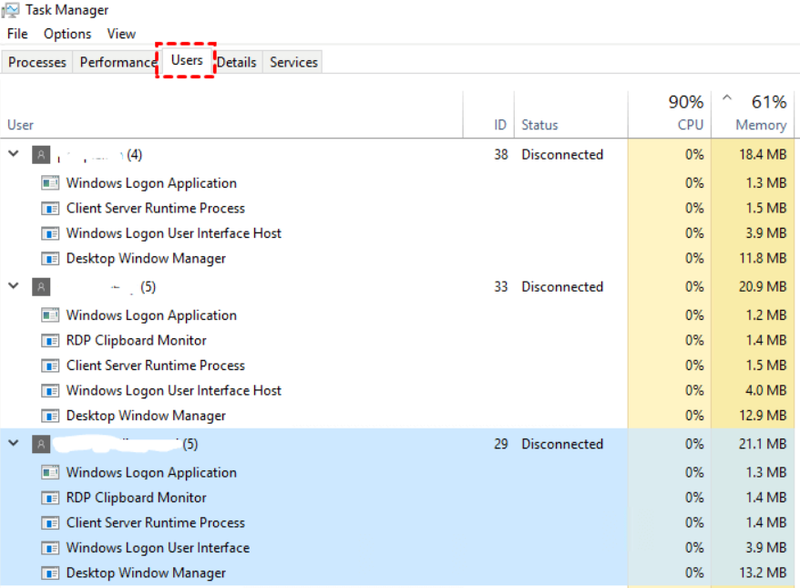
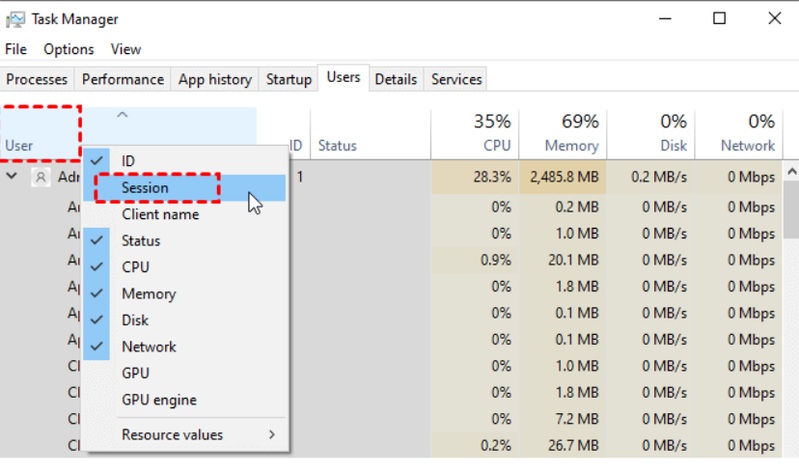
Right-click any column, select Session, and check the session types (RDP, console, terminal, etc.).
Identify users connected via RDP and ensure their statuses are Disconnected. With this step, you’ve successfully applied the first technique to fix the error

You have successfully finished the first technique to Fix the Number of Connections to this Computer is Limited Error.
Solution 2. Using GPO to Enable Multiple Remote Desktop Connections
A Group Policy Object (GPO) is a collection of policy settings that could potentially cause issues. If the “The number of connections to this computer is limited” error persists, the second solution involves updating the Group Policy to allow multiple connections.
- The RDP “The number of connections to this computer is limited” issue might have been resolved if you managed to update the Group Policy to permit multiple connections.

- Follow these steps:
- Computer Configuration > Administrative Templates > Windows Components > Remote Desktop Services > Remote Desktop Session Host > Connections.
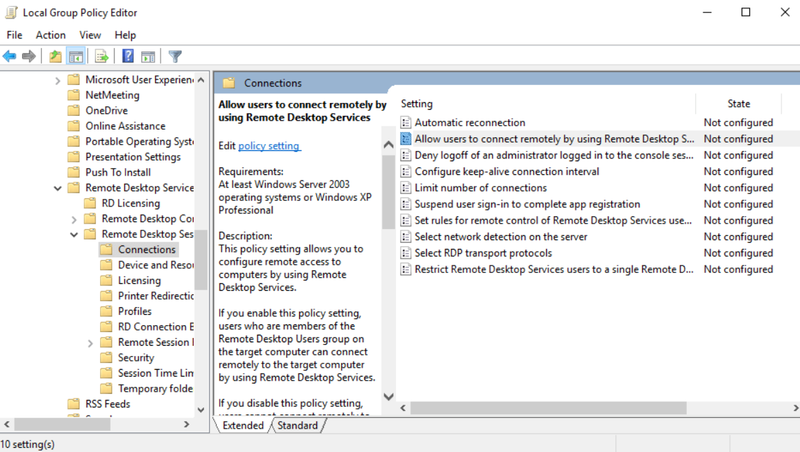
In the right pane, locate Limit Number of Connections and double-click it.
Set it to Enabled, then enter your desired connection limit.
Next, find and double-click Restrict Remote Desktop Services users to a single Remote Desktop Services session in the same pane.
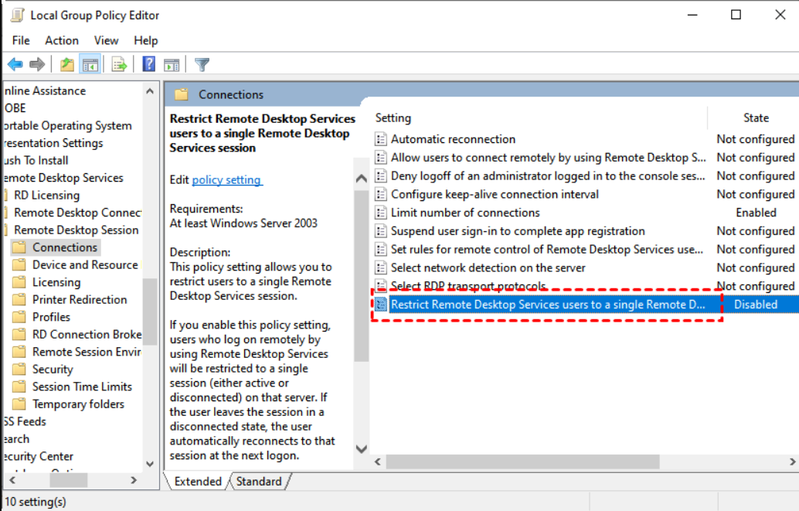
Set this option to Disabled to remove user restrictions.
Finally, restart your computer for the changes to take effect. This will resolve the error by allowing multiple concurrent RDP connections.
Conclusion
In this article, you learned how to enable multiple RDP sessions. To allow multiple RDP connections, you need to disable the single-user remote desktop mode and adjust the remote connection limit. This enables two RDP sessions simultaneously for free. However, if you need more, you must install the RDS role on the server. The RDS feature is free for 120 days, after which you must purchase an RDS license to continue using it.
This guide also covered how to fix “The Number of Connections to This Computer is Limited” error. Two solutions were explained to help you resolve the issue. If you have other methods or solutions, feel free to share them with us. By following the two solutions provided, you can easily fix the error. However, if any issues arise, don’t hesitate to contact us. Our technical support team will assist you in resolving any problems efficiently.