
How to Access Windows 10 Safe Mode: A Step-by-Step Guide
Windows 10 Safe Mode is a built-in troubleshooting feature that allows users to start their system with only essential drivers and services. This mode is useful when diagnosing and fixing system issues such as software conflicts, driver errors, or malware infections. If your PC is facing crashes, boot failures, or slow performance, knowing how to start Windows 10 in Safe Mode can help you resolve these problems effectively.
In Safe Mode, the operating system runs with minimal components, making it easier to identify the root cause of errors. This is especially helpful when dealing with stubborn programs that prevent normal startup or when removing viruses and unwanted software. Because fewer processes are active, troubleshooting becomes faster and more focused.
There are several ways to enter Safe Mode in Windows 10, depending on your situation. If your system is working normally, you can access it through system settings or by using the Shift + Restart option. However, if your computer is not booting properly, you can still access Safe Mode using the Windows Recovery Environment (WinRE) or by interrupting the boot process. Advanced users can also enable it using Command Prompt or the System Configuration tool (msconfig).
This guide explains different methods step by step so you can troubleshoot issues efficiently. Whether you are a beginner or an experienced user, understanding Safe Mode will help you restore system stability and improve overall performance.

How to Start Windows 10 in Safe Mode
Safe Mode in Windows 10 is a diagnostic mode that helps troubleshoot and fix various system issues. It starts Windows with only essential drivers and services, making it easier to identify and resolve problems caused by third-party applications, drivers, or malware. If how to start windows 10 in safe mode you’re experiencing crashes, blue screen errors, or performance issues, booting into Safe Mode can be a valuable first step.
In this guide, we’ll cover how to start Windows 10 in Safe Mode using multiple methods.
Methods to Enter Safe Mode in Windows 10
1. Using the Settings Menu
If your system is functional, you can enter Safe Mode through the Settings menu.
- Click on Start and select Settings (gear icon).
- Go to Update & Security.
- Click Recovery in the left panel.
- Under Advanced startup, click Restart now.
- Your PC will restart and enter the Windows Recovery Environment (WinRE).
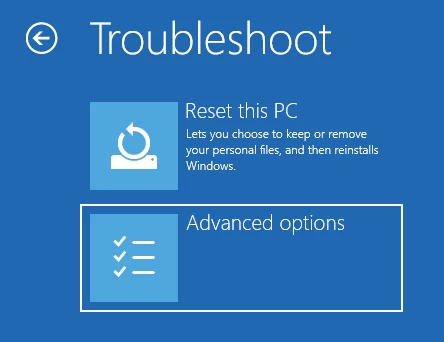
- Select Troubleshoot > Advanced options > Startup Settings.
- Click Restart.
- After the restart, a list of options will appear. Press 4 or F4 to enter Safe Mode. To enable networking, press 5 or F5.
2. Using the Shift + Restart Method
If you’re unable to access the Settings menu, this method is an alternative.
- Press and hold Shift while clicking on Restart from the Start menu.
- Your computer will restart into Advanced Startup Options.
- Follow the steps mentioned above (Troubleshoot > Advanced options > Startup Settings > Restart).
- Choose 4 or F4 for Safe Mode or 5 or F5 for Safe Mode with networking.
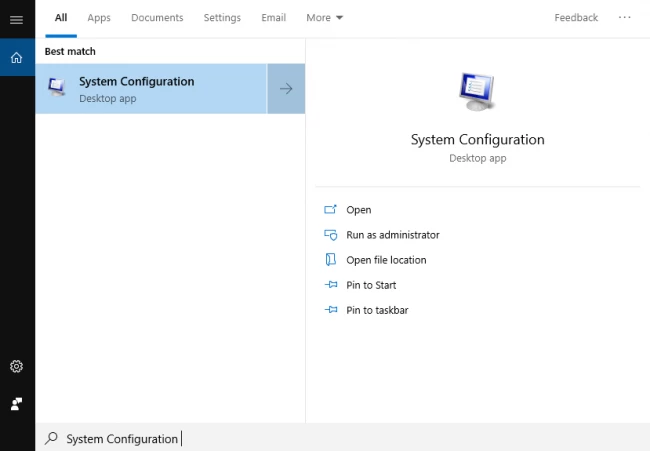
3. Using the System Configuration (msconfig)
Another way to enter Safe Mode in Windows 10 is through the System Configuration tool.
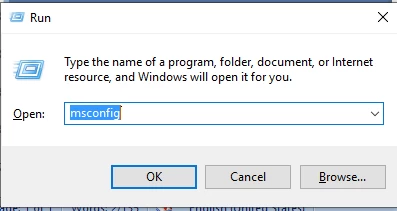
- Press Windows + R to open the Run dialog box.
- Type msconfig and hit Enter.
- Go to the Boot tab.
- Under Boot options, check Safe boot and choose Minimal.
- Click OK and then Restart.
- Your PC will boot into Safe Mode.
To exit Safe Mode, open msconfig again, uncheck Safe Boot, and restart your PC.
4. Using Command Prompt
If Windows fails to boot normally, you can access Safe Mode via the Command Prompt.
- Boot into Windows Recovery Environment (WinRE) by turning off and on your PC three times.
- Select Advanced options > Command Prompt.
- Type the following command and press Enter:
bcdedit /set {default} safeboot minimal - Restart your PC, and it will boot into Safe Mode.
To disable Safe Mode later, open Command Prompt and type:
bcdedit /deletevalue {default} safeboot
Restart your computer normally.
5. Using a Recovery Drive
If none of the above methods work, you can use a recovery USB drive to access Safe Mode.
- Insert a Windows 10 recovery USB drive.
- Boot from the USB by changing the boot order in BIOS.
- Select Troubleshoot > Advanced options > Startup Settings.
- Click Restart and then press 4 or F4 to enter Safe Mode.
Use the System Configuration Tool (msconfig.exe) to enable Safe Mode
Safe Mode is a diagnostic mode in Windows 10 that helps troubleshoot issues by starting the operating system with minimal drivers and services. If you are facing system instability, software conflicts, or malware attacks, booting into how to enter safe mode windows 10 Safe Mode can be an effective solution. One of the simplest ways to enable Safe Mode is by using the System Configuration tool (msconfig.exe).
What is Safe Mode?
Safe Mode is a feature in Windows that loads only essential system files and drivers. It helps identify and resolve problems by eliminating unnecessary background processes that could be causing errors. When in Safe Mode, users can uninstall problematic applications, update drivers, or run antivirus scans to fix system issues.
Steps to Enable Safe Mode Using msconfig.exe
Using the System Configuration tool is a convenient way to enable Safe Mode without requiring advanced technical knowledge. Follow these steps:
1: Open the System Configuration Tool
- Press Win + R on your keyboard to open the Run dialog box.
- Type msconfig and press Enter or click OK.
2: Configure Safe Mode Settings
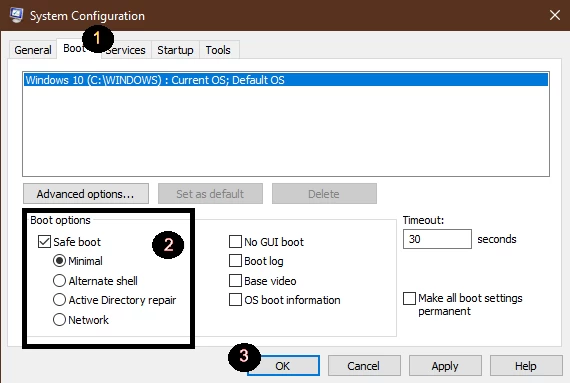
- In the System Configuration window, navigate to the Boot tab.
- Under Boot options, check the Safe Boot box.
- Select one of the following Safe Mode options:
- Minimal: Loads only essential drivers and services.
- Alternate shell: Starts Safe Mode with the Command Prompt.
- Network: Loads Safe Mode with network drivers for internet access.
- Minimal: Loads only essential drivers and services.
- Click Apply, then OK.
3: Restart Your Computer
- A prompt will appear asking if you want to restart your computer now or later.
- Click Restart to immediately boot into Safe Mode.
- Once your PC restarts, it will load into the selected Safe Mode configuration.
4. Exiting Safe Mode
After troubleshooting, you may want to exit Safe Mode and return to normal Windows operation. Here’s how:
- Open the Run dialog box (Win + R) and type msconfig.
- Navigate to the Boot tab and uncheck the Safe Boot option.
- Click Apply, then OK.
- Restart your computer, and Windows 10 will boot normally.
5. When to Use Safe Mode
Safe Mode can be helpful in several scenarios, including:
- Fixing startup issues: If Windows fails to boot normally, Safe Mode can help troubleshoot the problem.
- Removing malware: Some malware programs prevent security tools from running in normal mode. Safe Mode allows antivirus programs to scan and remove threats effectively.
- Uninstalling problematic software: If a recently installed application is causing system crashes, you can use Safe Mode to remove it safely.
- Updating or rolling back drivers: Sometimes, a new driver update may cause compatibility issues. Safe Mode allows you to roll back to a previous driver version.
Alternative Ways to Enter Safe Mode in Windows 10
While the System Configuration tool is a straightforward method, there are other ways to access Safe Mode, such as:
- Using Advanced Startup Options: Restart your PC and hold Shift while clicking Restart to access Safe Mode through advanced recovery options.
- Interrupting Boot Process: Force shut down your PC three times to trigger the Windows Recovery Environment and enter Safe Mode from there.
- Using Command Prompt: Run bcdedit /set {current} safeboot minimal in Command Prompt with administrator privileges.
Use “Shift + Restart” on the Windows 10 Sign-in Screen
Windows 10 offers several recovery and troubleshooting options, one of which is the “Shift + Restart” feature. This method allows users to access the Advanced Startup Options menu, which includes tools for troubleshooting, resetting the system, and accessing safe mode.
What is “Shift + Restart”?
“Shift + Restart” is a built-in Windows 10 function that enables users to boot into the Advanced Startup Options without needing physical recovery media or special command-line instructions. It is particularly useful when troubleshooting issues that prevent normal startup.
How to Use “Shift + Restart” on the Windows 10 Sign-in Screen
If you are on the Windows 10 sign-in screen and need to access the Advanced Startup Options, follow these steps:

- On the sign-in screen, press and hold the Shift key on your keyboard.
- While holding Shift, click the Power icon in the lower-right corner of the screen.
- Select Restart while still holding the Shift key.
- Windows 10 will restart and load the Advanced Startup Options menu.
Available Options in Advanced Startup
Once you have entered the Advanced Startup Options menu, you can choose from several troubleshooting and recovery tools:
- Continue – This exits the menu and boots normally into Windows 10.
- Use a Device – Boot from a USB drive, network connection, or recovery disk.
- Troubleshoot – This option provides access to advanced troubleshooting tools, including:
- Reset this PC – Reinstall Windows with an option to keep or remove personal files.
- Advanced options, which include:
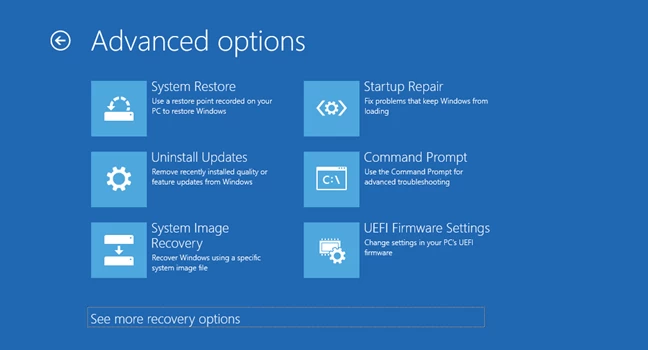
- Startup Repair – Fixes issues preventing Windows from starting.
- Command Prompt – Opens a command-line interface for advanced troubleshooting.
- Uninstall Updates – Removes recent Windows updates that may be causing problems.
- System Restore – Restores Windows to a previous working state.
- System Image Recovery – Restores Windows using a saved system image.
- Startup Settings – Allows booting into Safe Mode and other diagnostic modes.
Why Use “Shift + Restart”?

- Fix Startup Issues – If Windows is not booting properly, you can try Startup Repair or System Restore.
- Boot into Safe Mode – Safe Mode can help troubleshoot driver or software issues.
- Remove Problematic Updates – If a recent Windows update is causing problems, you can uninstall it.
- Perform a System Reset – You can reset your PC while keeping or removing personal files.
- Access Command Prompt – Advanced users can use command-line tools for troubleshooting.
Conclusion
Understanding how to access Safe Mode in Windows 10 is essential for troubleshooting various system issues. Whether your computer is facing crashes, malware infections, or driver conflicts, booting into this mode helps diagnose and fix problems efficiently.
When it comes to starting Windows 10 in Safe Mode, there are multiple methods available. You can use the System Configuration tool (msconfig), access Advanced Startup Options, or restart your PC while holding the Shift key to enter recovery mode. These options provide flexibility depending on whether your system is accessible or not.
For users looking for step-by-step guidance, it’s important to understand the different boot options. There are three main types available:
- Safe Mode – Loads only essential drivers and services
- Safe Mode with Networking – Adds internet access support
- Safe Mode with Command Prompt – Enables advanced troubleshooting using commands
No matter which method you choose, knowing how to enter Safe Mode in Windows 10 can be extremely helpful during system errors or performance issues. Following the correct steps can restore stability, remove problematic software, and improve overall system performance.