
How to Switch Users in Ubuntu: Complete User Management Guide
Ubuntu, a popular Linux distribution, supports more than one person money owed, allowing exceptional customers to get entry to the device with personalised settings and permissions. Whether you’re dealing with a shared gadget or want to execute commands as linux change user another consumer, knowing a way to transfer users efficiently is crucial.
This guide will walk you via one-of-a-kind approaches to replace users in Ubuntu, from the use of the terminal to switching in a graphical interface. Whether you need to exchange linux change user customers in Linux briefly, log in as every other user without logging out, or maybe upload a new user in Ubuntu, we have got you covered.
By following those steps, you’ll be able to transfer users seamlessly and manipulate your Ubuntu machine effectively. Let’s dive in!

Understanding User Permissions in Ubuntu
User permissions in Ubuntu play a crucial role in managing system security and access control. Ubuntu, like other Linux distributions, follows a multi-user architecture where each user has specific rights and restrictions based on their role. Understanding these permissions helps in effectively managing user access, securing files, and executing administrative tasks.
Types of Users in Ubuntu
- Root User – The superuser with full control over the system.
- Regular Users – Have limited access and require permission to execute administrative commands.
- System Users – Created for system processes and services.
User Permissions in Ubuntu
Every file and directory in Ubuntu has three types of permissions:
- Read (r) – Allows viewing the content of a file.
- Write (w) – Allows modifying a file or directory.
- Execute (x) – Grants permission to run a file as a program or script.
Permissions are assigned to three categories:
- Owner – The user who created the file.
- Group – A set of users with shared access.
- Others – All other users on the system.
Managing User Permissions
- To change users in Linux, use the su command to switch to another user.
- The sudo command allows temporary administrative access for authorized users.
- To switch users in Linux, use su – username in the terminal.
To create a new user in Ubuntu, use the adduser command from the terminal:
sudo adduser new_username
This command creates a new user account and guides you through setting a password and basic account information. Properly managing user accounts and permissions helps improve system security, control access to resources, and maintain a stable and efficient Ubuntu environment.
Root vs. Standard vs. Guest Users: An Ubuntu Comparison
Ubuntu, like other Linux distributions, follows a multi-user environment where different user types have varying levels of control and access. Understanding the differences between Root, Standard, and Guest users helps in managing system security and permissions effectively.
1. Root User (Superuser)
The root user is the most powerful account in Ubuntu with unrestricted access to all system files and settings. It can install and remove software, modify system files, and manage user accounts. However, direct login as root is disabled by default in Ubuntu linux change user security reasons. Instead, users can gain root privileges using the sudo command.
To gain temporary root access in Ubuntu, you can use the following command:
sudo su
This command opens a root shell, allowing you to perform administrative tasks with superuser privileges. Since root access provides complete control over the system, it should be used carefully and only when necessary.
2. Standard User
A standard user has limited access, mainly restricted to their own files and directories. They cannot modify system settings or install software without sudo privileges. However, they can perform everyday tasks like browsing the web, editing documents, and running applications.
To switch to another user account in Linux, use the following command:
su – username
Replace username with the name of the user you want to access. This command loads the target user’s environment and permissions, allowing you to work under that account after entering the correct password.
3. Guest User
A guest user has even more restrictions than a standard user. They can log in without a password but cannot install software, modify system files, or access other users’ data. Their session is temporary, meaning all changes are lost after logout.
Managing users in Ubuntu is straightforward using terminal commands. To switch from one user account to another, you can use the su command. If you need to create a new user account, Ubuntu provides the adduser command, which guides you through the setup process and creates the account with the necessary configuration.
The Role of Permissions in User Switching in Ubuntu
User permissions play a crucial role in managing access and ensuring security when switching between accounts in Ubuntu. Whether using the Graphical User Interface (GUI) or Command Line Interface (CLI), permissions determine what actions a user can perform and whether they can successfully switch users in Linux.
1. Understanding User Permissions
Each user in Ubuntu has specific permissions that define their level of access:
- Standard Users – Have limited access and cannot modify system settings.
- Administrators (Sudo Users) – Can execute commands with elevated privileges.
- Root User (Superuser) – Has full control over the system.
Files and directories in Ubuntu also have Read (r), Write (w), and Execute (x) permissions, assigned to:
- Owner – The user who owns the file.
- Group – Other users in the same group.
- Others – All other users.
2. How Permissions Affect User Switching
A standard user can switch to another user account only if they know that user’s password. The su command is commonly used for this purpose and loads the target user’s environment after successful authentication. Users with sudo privileges have greater flexibility and can switch to other accounts or gain temporary root access for administrative tasks. If a user lacks the required permissions, Ubuntu may display a “Permission Denied” error when attempting to access another account or perform restricted actions.
3. Assigning Permissions to New Users
After creating a new user account in Ubuntu, you can provide administrative privileges by adding the user to the sudo group. Members of this group are allowed to execute commands with elevated permissions, making it easier to perform system administration tasks without logging in directly as the root user.
Changing User via Command Line Interface (CLI) in Ubuntu
In Ubuntu, switching between user accounts via the Command Line Interface (CLI) is an essential skill for system administrators and regular users. The terminal provides linux change user efficient ways to switch users, execute commands with different privileges, and manage multiple user accounts.
1. Switching Users with the su Command
The su (substitute user) command is used to switch from one user account to another without logging out of the current session.
Syntax:
su – username
Example:
su – john
This command changes the current session to the user account named “john” and loads that user’s environment settings. You will be prompted to enter the target user’s password before access is granted.
If you need temporary administrative access, you can switch to the root user using:
sudo su
This command opens a root shell and provides elevated privileges for system administration tasks.
2. Using sudo for Temporary User Privileges
Instead of switching users entirely, you can execute commands as another user using sudo.
Example:
bash
CopyEdit
sudo -u username command
This runs a command as another user without a full switch.
3. Adding a New User Before Switching
If you need to create a new user before switching, use the adduser command:
bash
CopyEdit
sudo adduser new_username
After creating the user, you can switch to them using su – new_username.
Switching Users through Graphical User Interface (GUI) in Ubuntu
Ubuntu provides a user-friendly Graphical User Interface (GUI) to switch between multiple user accounts seamlessly. This method is ideal for users who prefer a visual approach over the Command Line Interface (CLI).
1. Switching Users Without Logging Out
If multiple users have accounts on the system, Ubuntu allows quick switching without logging out.
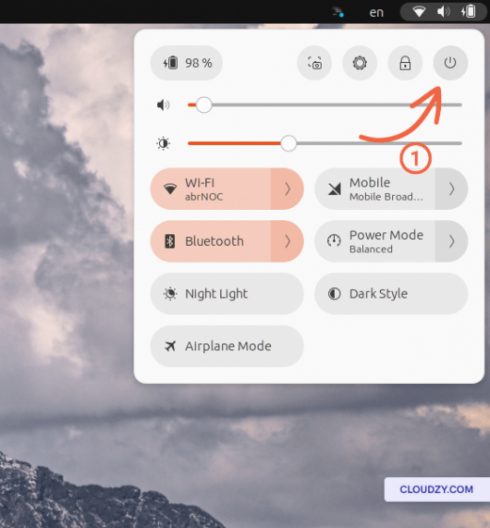
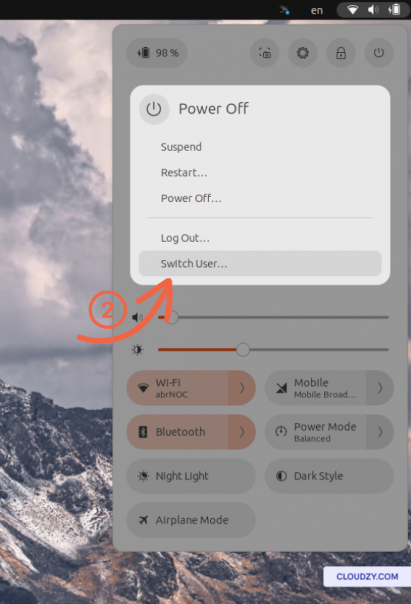
Steps to Switch Users via GUI:
- Click on the top-right system menu (near the power button).
- Select “Switch User” or “Log Out” (depending on your Ubuntu version).
- On the login screen, choose the desired user account.
- Enter the password to log in.
This method enables you to switch users without closing active applications, making it convenient for shared computers.
2. Logging Out and Logging in as Another User
If you prefer a clean session:
- Click the top-right menu and select “Log Out”.
- Select the new user from the login screen.
- Enter the password and continue.
3. Adding a New User in Ubuntu (GUI)
Before switching users, you might need to add a new user in Ubuntu:
- Open Settings → Users.
- Click “Add User” and provide details.
- Set a password and confirm.
Using Fast User Switching Feature in Ubuntu
Ubuntu’s Fast User Switching feature allows multiple users to stay logged in simultaneously, making it easy to switch accounts without closing applications. This is especially useful for shared computers, linux change user where different users need to access their accounts without disrupting each other’s work.
1. How Fast User Switching Works
Unlike logging out, which closes all running applications, Fast User Switching lets another user log in while keeping the previous user’s session active in the background. This way, each user can continue their work from where they left off after switching back.
2. How to Use Fast User Switching in Ubuntu (GUI Method)
- Click the top-right system menu (near the power icon).
- Select “Switch User” instead of logging out.
- The login screen will appear—select the user you want to switch to.
- Enter the password and continue.
The previous user’s session remains active, ensuring their work isn’t lost.
3. Switching Users via Terminal (CLI Method)
If you prefer using the command line, you can switch users without logging out:
bash
CopyEdit
su – username
This method is useful when managing multiple accounts through the terminal.
4. Adding a New User Before Switching
To use Fast User Switching effectively, each person must have their own account. You can add a new user in Linux Ubuntu using:
bash
CopyEdit
sudo adduser new_username
Creating a New User in Ubuntu
Managing multiple users in Ubuntu is essential for system security and organization. Whether you’re setting up a new account for a team member or creating separate accounts for different tasks, adding a user ensures proper access control. Ubuntu allows you to create users using both the Graphical User Interface (GUI) and the Command Line Interface (CLI).
1. Creating a New User via Command Line (CLI)
Creating a new user in Ubuntu through the terminal is a quick and efficient process. Open the terminal and use the adduser command to create a new account. During setup, Ubuntu will prompt you to create a password and optionally enter user information such as a full name and contact details. Once the process is complete, the new user account will be ready to use.
If the user requires administrative permissions, you can grant sudo access by adding the account to the sudo group. This allows the user to perform system-level tasks and execute commands with elevated privileges when necessary.
2. Creating a New User via GUI
If you prefer a graphical approach, follow these steps:
- Open Settings and navigate to Users.
- Click “Add User” and enter the required details.
- Set a password and user type (Standard or Administrator).
- Click “Add”, and the new user is ready to use.
3. Switching Between Users
After creating a user account, Ubuntu allows you to switch between users easily through both graphical and command-line methods. In the desktop environment, you can select the user switching option from the system menu and log in to another account. If you prefer the terminal, use the su command followed by the username to change to the newly created account and start working under that user’s environment.
GUI Method: Creating a User through System Settings in Ubuntu
Ubuntu provides a simple and user-friendly way to add a new user through the Graphical User Interface (GUI). This method is ideal for users who prefer a visual approach over the terminal. By creating separate accounts, multiple users can maintain their own settings, files, and permissions while using the same system.how to login as superuser in ubuntu.
Steps to Create a New User via GUI
- Open System Settings:
- Click on the top-right system menu and select “Settings”.
- Navigate to the Users section.
- Unlock Administrative Controls:
- Click the “Unlock” button (you may need to enter your password).
- Click the “Unlock” button (you may need to enter your password).
- Add a New User:
- Click “Add User” and enter the required details:
- Full Name: Display name for the user.
- Username: The login name for the user.
- Password: Choose to set a password now or allow the user to set it on first login.
- Click “Add User” and enter the required details:
- Choose Account Type:
- Standard User: Limited access without administrative rights.
- Administrator: Has system-wide permissions, including software installation and user management.
- Save and Create the User:
- Click “Add” to complete the process.
- Click “Add” to complete the process.
Switching Between Users in GUI
After adding a new user, you can easily switch users in Linux:
- Click the top-right system menu and select “Switch User”.
- Choose the newly created account and log in.
Setting Up Permissions for New Users in Ubuntu
When you add a user in Linux Ubuntu, it is essential to configure proper permissions to ensure security and access control. Ubuntu assigns default permissions to new users, but you can customize them based on specific requirements.
1. Understanding User Permissions
Each file and directory in Ubuntu has three types of permissions:
- Read (r) – Allows viewing the content of a file or directory.
- Write (w) – Grants permission to modify files or directories.
- Execute (x) – Required to run scripts or access directories.
Permissions are assigned to three groups:
- Owner – The user who created the file.
- Group – Other users in the same user group.
- Others – All other users on the system.
2. Assigning Permissions Using the Command Line
Once a new user account has been created, you can manage file ownership and access permissions using Ubuntu’s built-in commands. The chown command allows you to assign ownership of files and directories to a specific user, while the chmod command is used to control who can read, write, or execute a file. Properly configuring ownership and permissions helps maintain system security and ensures users have the appropriate level of access to resources.
3. Adding a User to a Group
To allow multiple users to share permissions, add them to a group:
bash
CopyEdit
sudo usermod -aG groupname new_username
4. Switching Users to Test Permissions
Once permissions are set, you can switch users in Linux to verify access:
bash
CopyEdit
su – new_username
Conclusion
Managing user accounts in Ubuntu is an important part of maintaining system security and organization. Whether you need to switch users in Linux, create a new account, assign permissions, or access administrative privileges, Ubuntu provides simple options through both the GUI and terminal. Commands like su, sudo, adduser, and usermod make user management efficient, while Fast User Switching allows multiple users to work on the same system without interrupting active sessions. Understanding the differences between root, standard, and guest users also helps ensure proper access control. By following the methods covered in this guide, you can confidently manage accounts, improve security, and streamline daily administration tasks on your Ubuntu system.